

Seamless Code Formatting: Setup ESLint, Prettier, Husky & Lint-staged for ReactJS


Why is code formatting important?
Code formatting and enforcing a specific code style are important for many reasons such as the readability of a codebase, collaborating on a project, doing better code reviews, etc. But the main reason I decided to start enforcing a code style is because of my git commits, it might sound odd, but let me explain. I am a person who likes to keep his commits clean and descriptive.

One day, while working on a ReactJS component file, I created the basic component, saved the changes, committed them, and then pushed them to the remote repository. A few days later, I continued working on the same project from a different system (not my own). I added a few more lines to the file and committed the changes. However, when I pushed the changes, I noticed that it showed 100 deletions and 108 insertions. Quite strange, isn't it? I was really confused upon seeing this. But as soon as I examined the changes, I realized that it was mainly due to converting single quotations to double, adding semicolons, and changing the indentation from 2 spaces to 4. I quickly realized that the disparity was caused by different Prettier configurations on the systems I worked on. Unfortunately, it resulted in a disruption of my git history.
When you look at this problem on a large scale, you will realize that if your project is open source then everyone contributing to the project will have some different approaches to writing the code and this can trash the commit history. Formatting the code a specific way and enforcing a code-specific code style can solve this and many other errors.
So let's see how we can prevent this from happening in a ReactJS Project.
What exactly are we going to do?
We are going to work in a ReactJS Vite codebase where we will be setting up all the necessary dependencies, scripts, and pre-commit hooks to enforce a specific code style. During the blog, I will be sharing snapshots of my package.json file and other files as well so that you can follow along. Other than that, we'll be making some meaningful commits as well.
Let's get started
We'll start by making a ReactJS Project. You can skip this section if you already have a project and you want to get started in setting up ESLint.
To create a ReactJS application using Vite, you should type the following command in the terminal. Below the command, I have shown all the options I select while creating the application.
npm create vite@latest
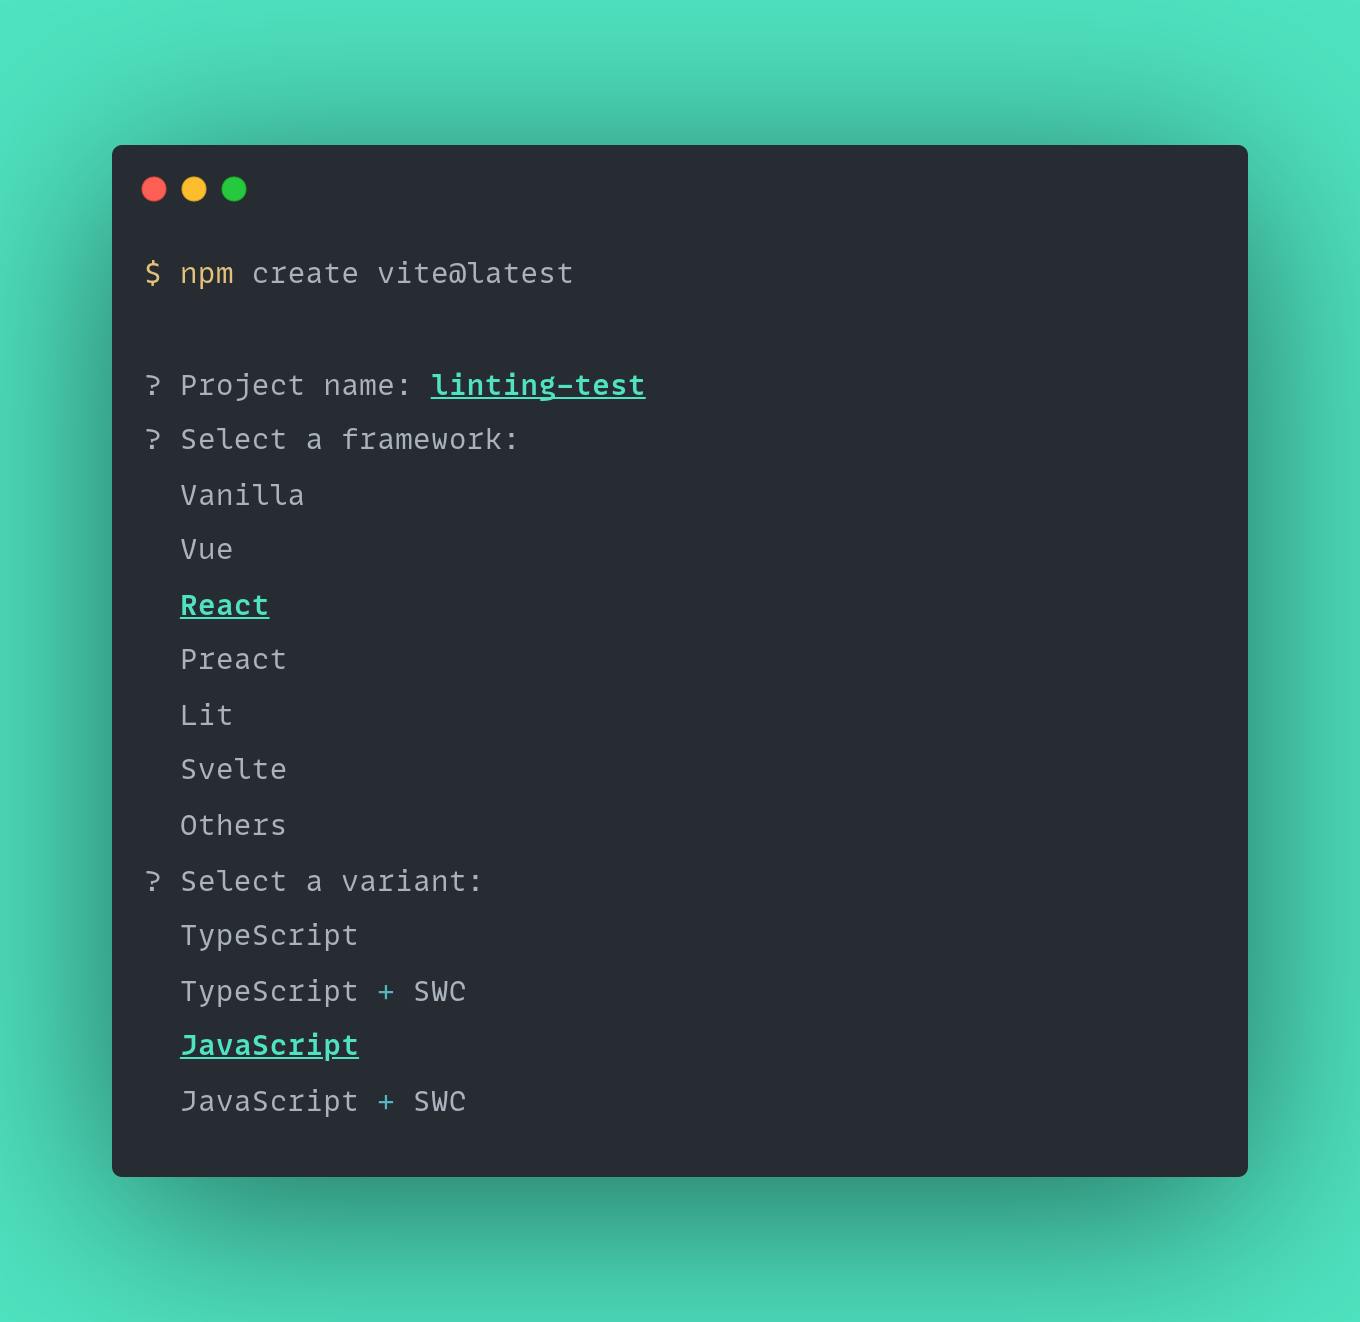
Please note that we will not be using Typescript in this tutorial, as if you're a beginner in setting up Eslint, using JS will be better as in TypeScript you'll have to config a few more files and install a few more dependencies.
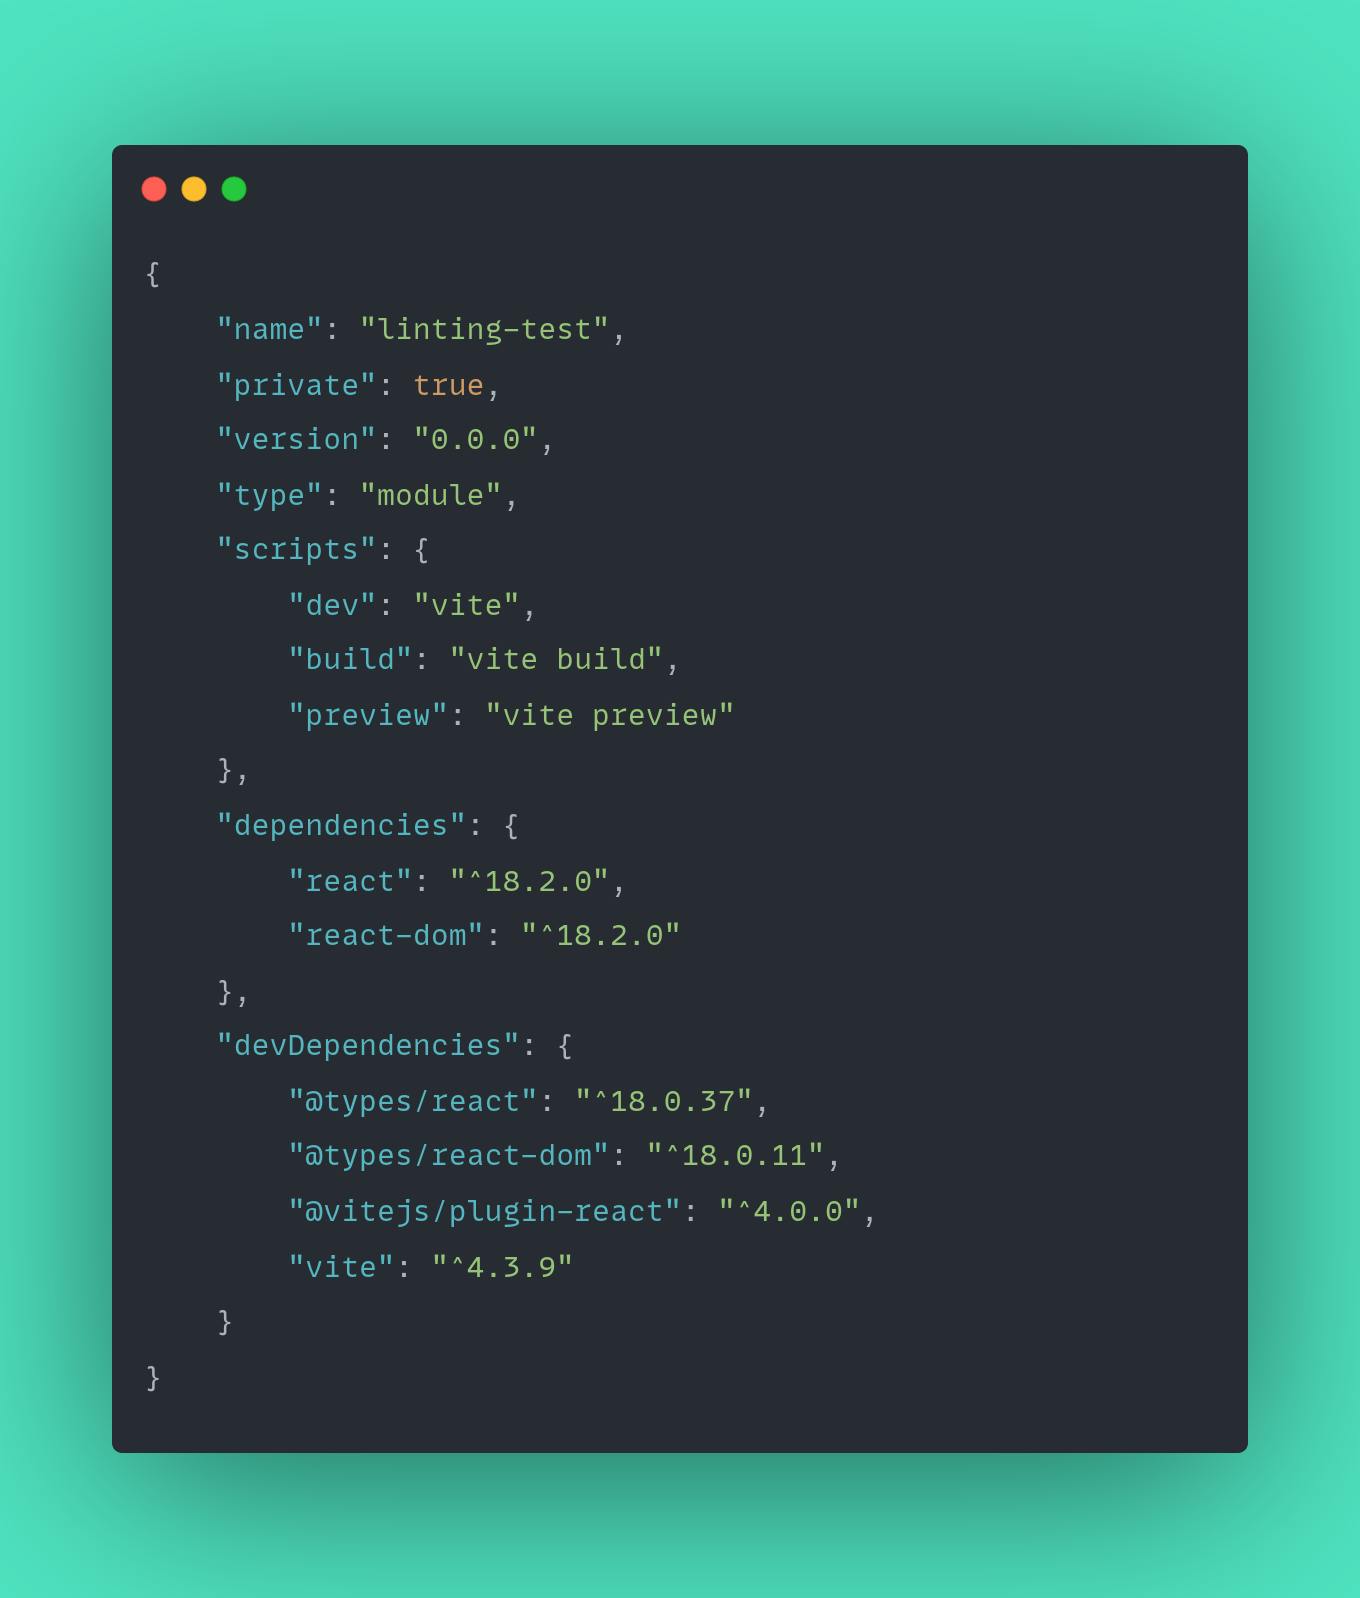
Now as we're done creating our ReactJS Application we can change the directory in the application using the command cd command and then do npm install to install all the dependencies.
Installing and setting up ESLint
Uninstalling Eslint
The current version of Vite (@4.3.9) comes with Eslint and other peer dependencies already installed. But in the future, Vite might stop installing Eslint by default. Not just that, but you can follow this tutorial by creating ReactJS applications by other methods (such as Create React App which is dead now) which don't have ESLint preinstalled. For these reasons, I'll first uninstall all the ESLint dependencies. You can skip this part if you're installation doesn't have ESLint already installed.
To uninstall ESLint and all its peer dependencies, you can type the following command in the terminal:
npm uninstall eslint eslint-plugin-react eslint-plugin-react-hooks eslint-plugin-react-refresh
You might also notice that there's an additional file of ESLint named .eslintrc.cjs by default. You can remove this file as well. You can also remove the lint script from the package.json file. At this point, my package.json looks like this:
Installing ESLint
Now let's install ESLint from scratch! One can start by typing npm init @eslint/config*. This should start the ESLint configuration. I have set the configuration in the following image:
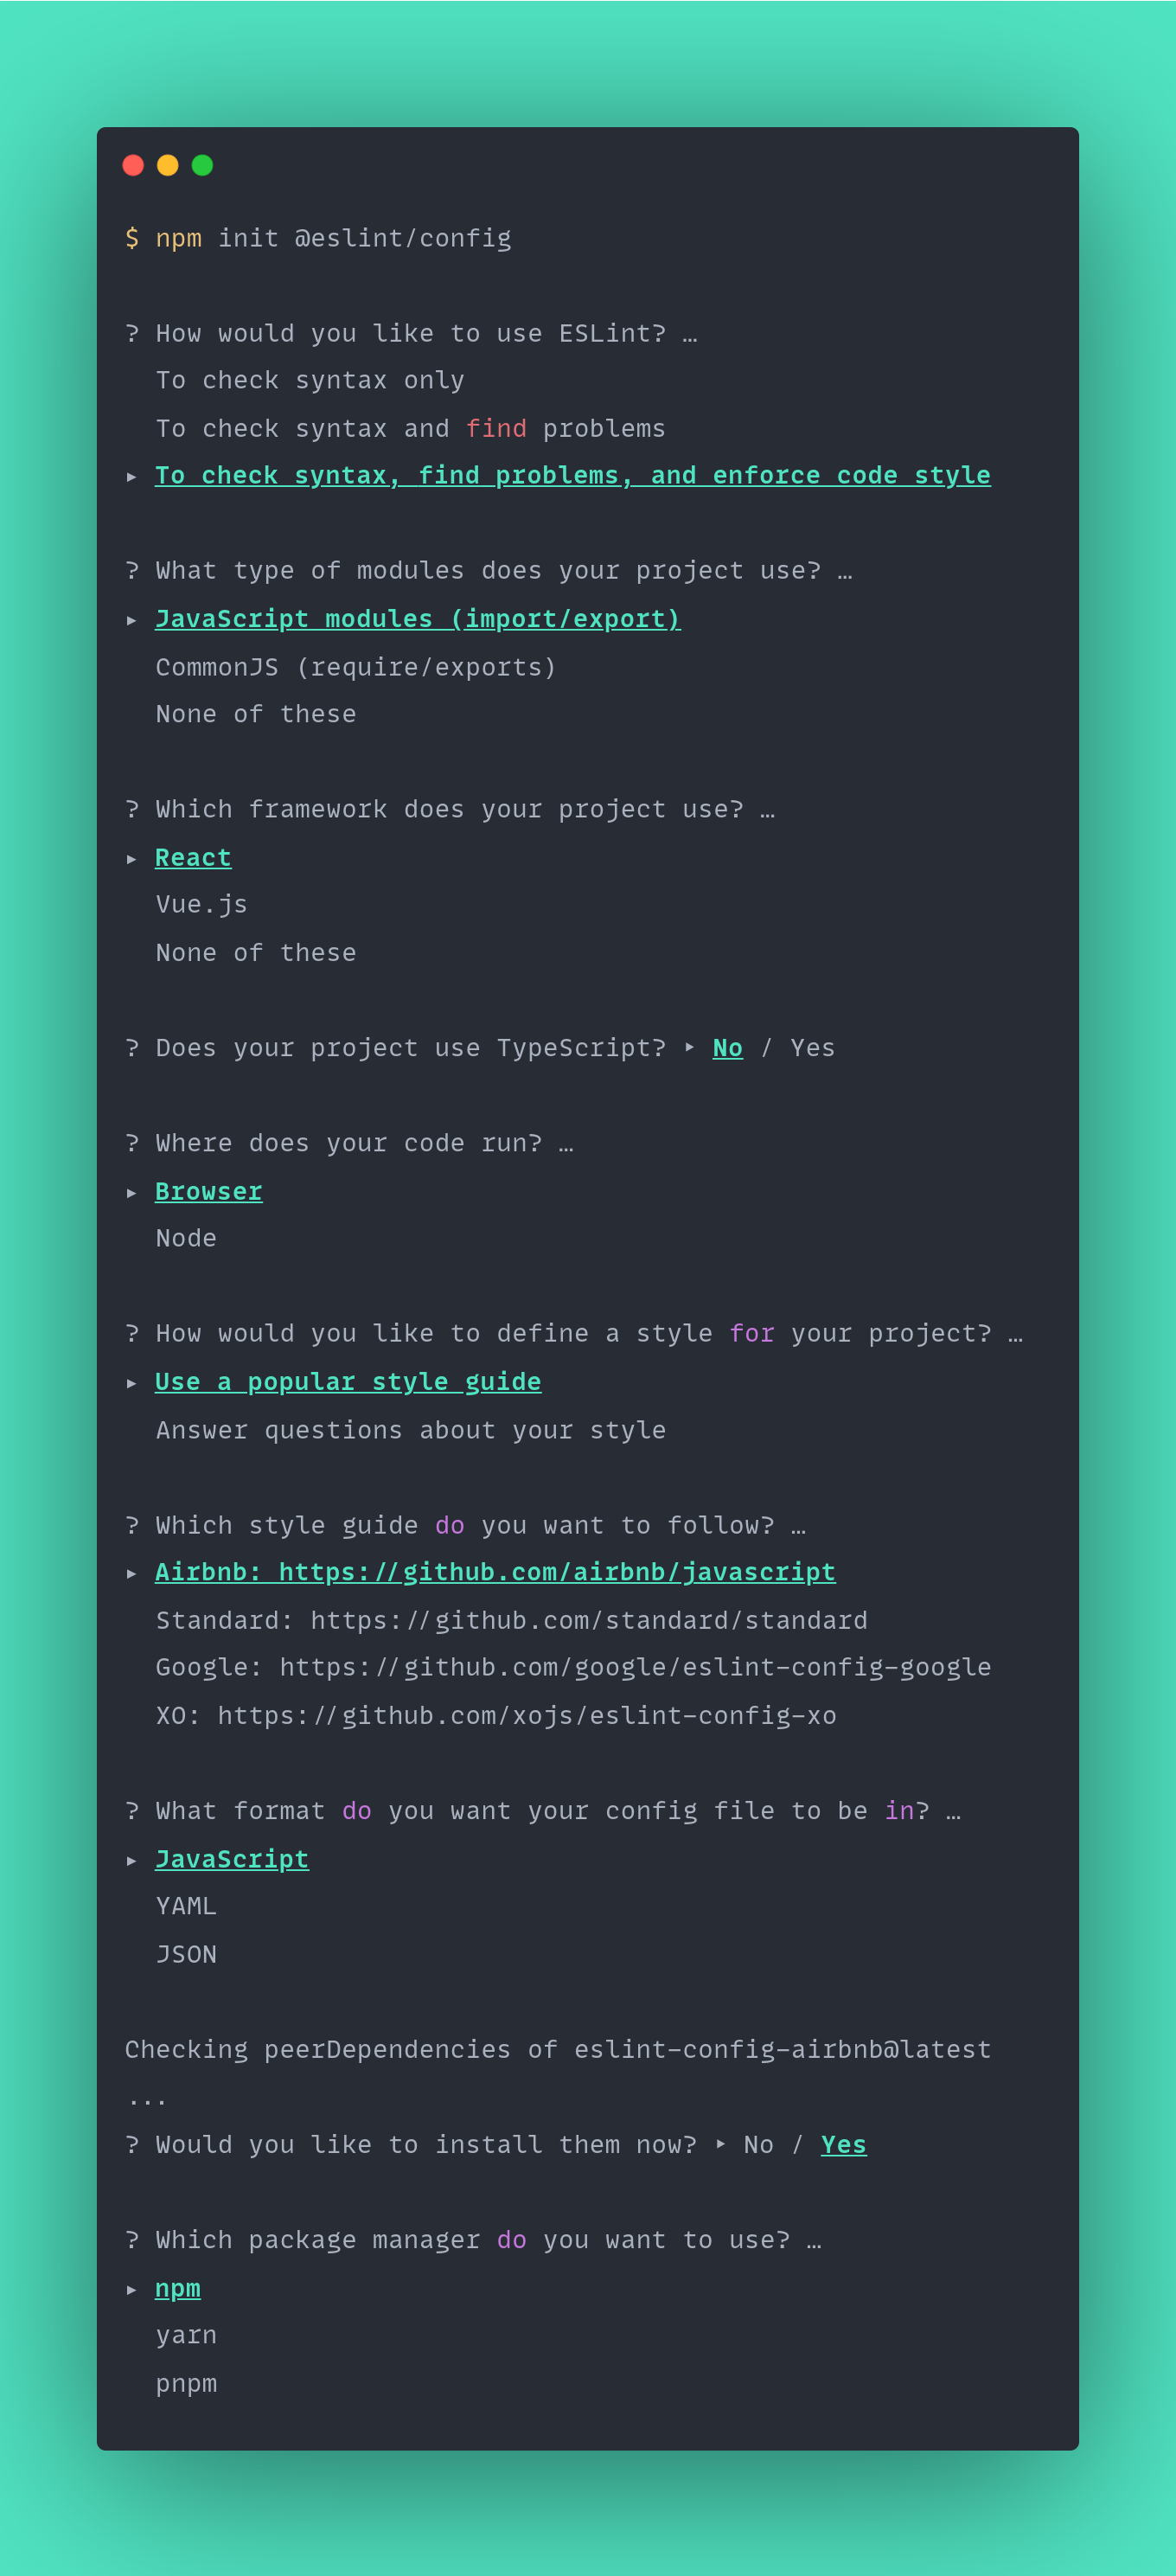
Woah woah woah, that's a pretty big image. Well, if you type the command yourself, you'd understand each and everything and more often than not you'll be selecting the options I select. I would suggest you explore all the options by yourself, but let's go over these one by one quickly.
The first question asks us the purpose of installing ESLint and we will select the last option because we want to enforce a code style. If we'd select either of the first two, someone would still be able to commit without writing the code in our style but the last one makes sure that the code is in a particular style we define.
The following questions are pretty self-explanatory, so we can skip them. Now, let's focus on the question "How would you like to define a style for your project?" If you choose the option we selected, it will prompt you to select a style guide. However, if you choose the other option, it will ask you a series of questions and generate a configuration file based on your answers, including all the style preferences you specified. The reason why I chose "Use a popular style guide" is that such a style guide already has many predefined rules that we can utilize. If we want to customize a rule to our liking, we can simply override it.
There are numerous style guides available, but AirBnb's style guide is considered comprehensive and up-to-date. I suggest you try out other style guides as well.
Lastly, let's discuss the question "What format do you want your config file to be in?" I chose JavaScript simply because I prefer it. However, YAML files have gained popularity recently, so you might want to give that format a try too.
npx @eslint/create-config if you're getting an error with the initially specified command. I have tried looking at different Stackoverflow answers on why this is happening but I didn't understand, somehow figured out this command works well.Setting up configuration files for ESLint
After creating the config, you'll see a new file in your directory and some newly installed devDependencies in your package.json.
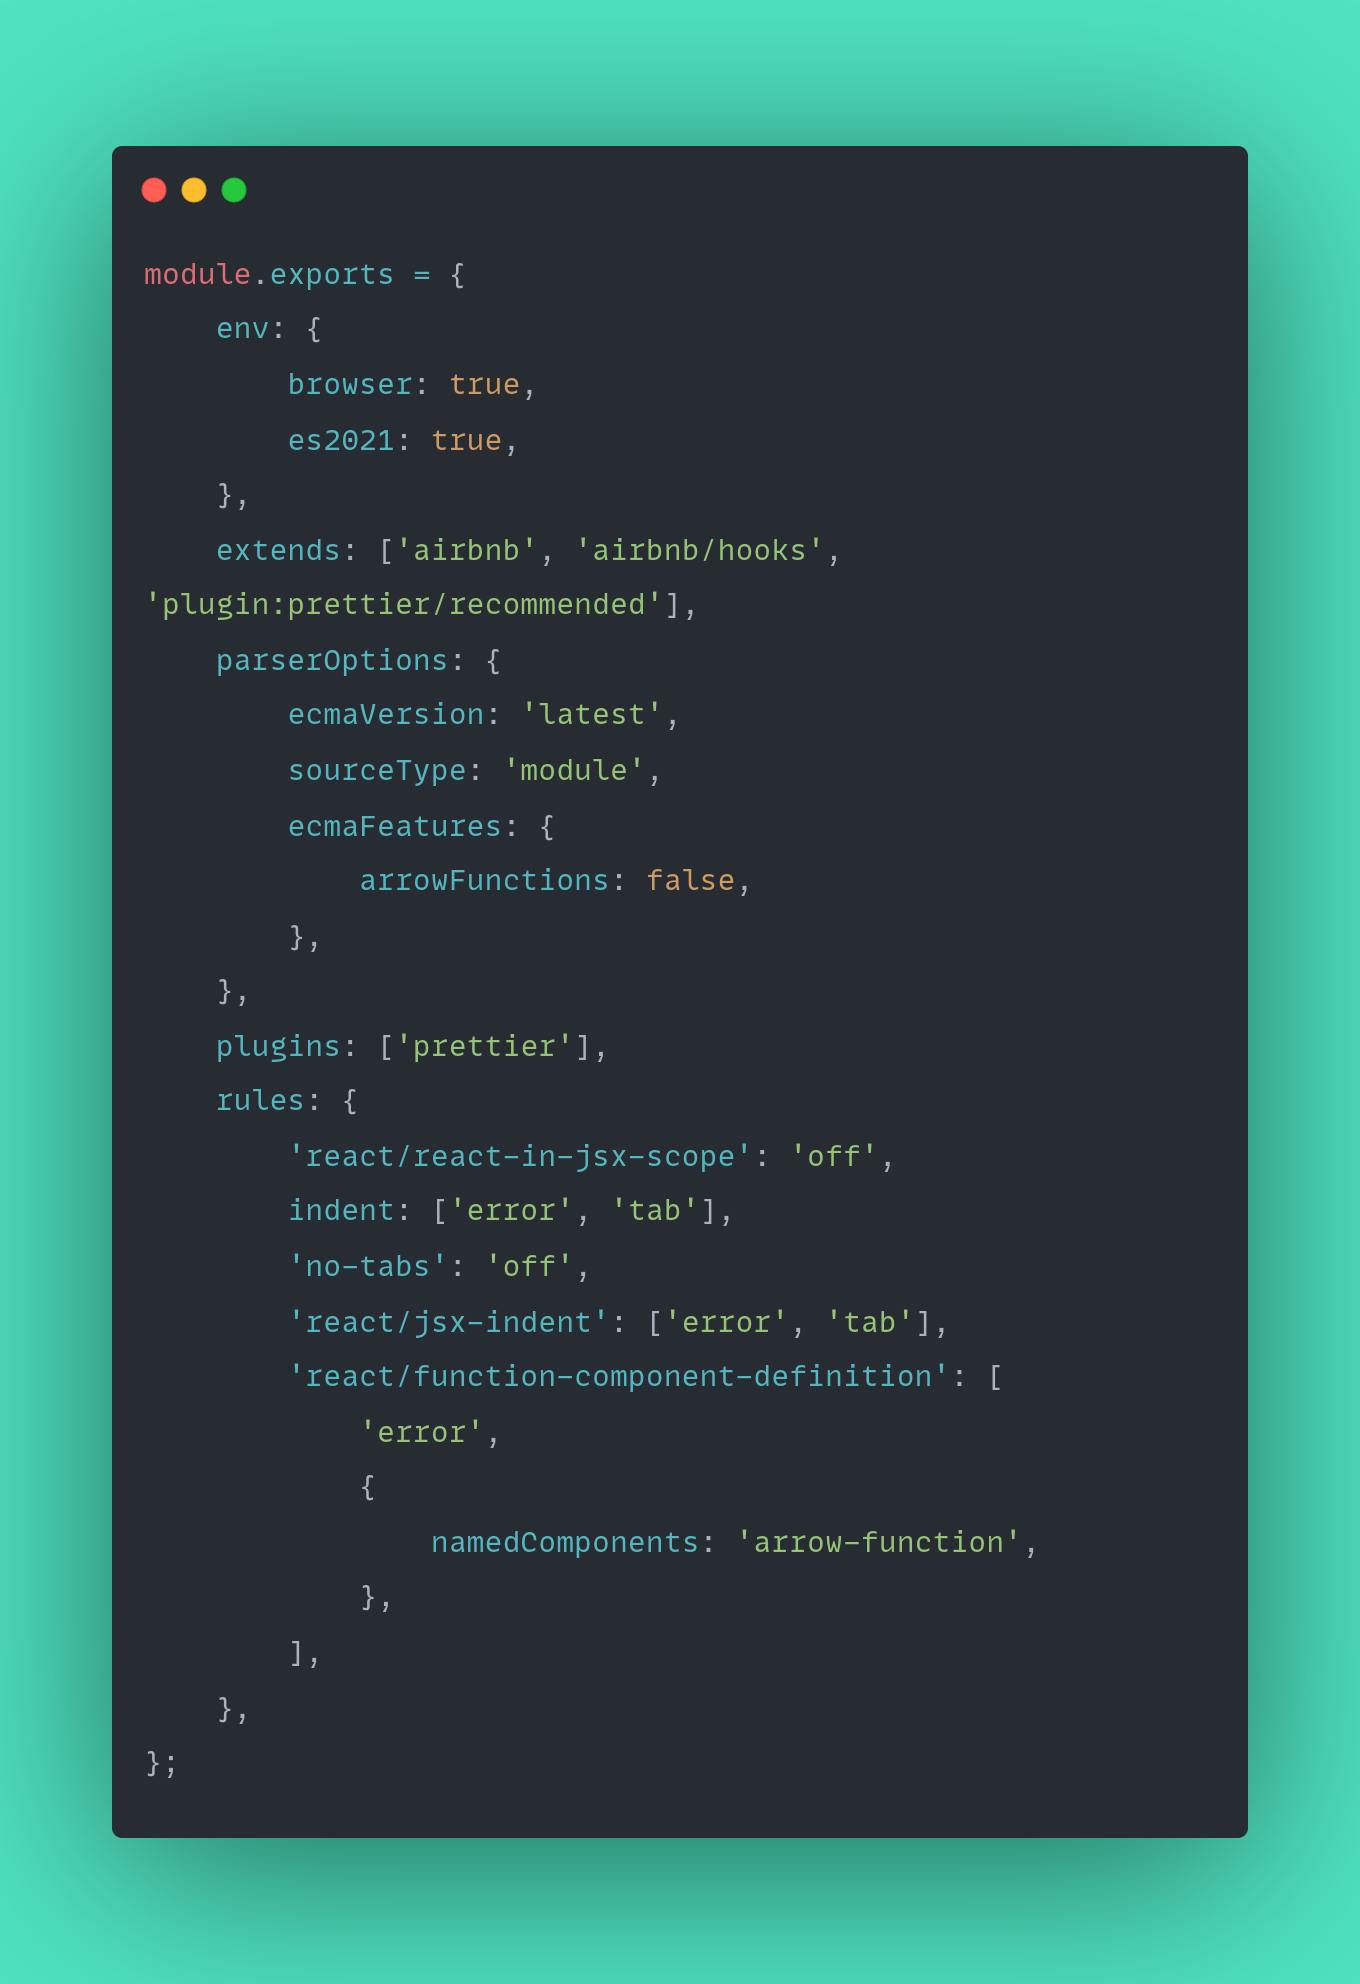
First, let's talk about the file. The new file will be in the format you chose while answering the questions above. I chose JavaScript so the new file is .eslintrc.cjs and it has some content inside it as well. You can straight up start using it, but I always like to override a few things and customize it according to my need. Below is my customized configuration file.
module.exports = {
    env: {
        browser: true,
        es2021: true,
    },
    extends: ['airbnb', 'airbnb/hooks'],
    parserOptions: {
        ecmaVersion: 'latest',
        sourceType: 'module',
        ecmaFeatures: {
            arrowFunctions: false,
        },
    },
    rules: {
        'react/react-in-jsx-scope': 'off',
        indent: ['error', 'tab'],
        'no-tabs': 'off',
        'react/jsx-indent': ['error', 'tab'],
        'react/function-component-definition': [
            'error',
            {
                namedComponents: 'arrow-function',
            },
        ],
    },
};
As you can see I have removed a few lines and modified a few lines. I have added airbnb/hooks in the 'extends' option. Other than that, I have also added a few rules in the rules object. These are some really simple rules and I would say you should search for them on the internet to know what they exactly mean. For example, the react/react-in-jsx-scope rule means that importing react should be necessary for a .jsx file, but as of React v18, it's not necessary, so I have turned it off. I would suggest you should explore all the rules by yourself and see what fits best for your coding style.
Now let's create another file and name it .eslintignore. This file will contain file and folder names that should not be considered by ESLint while checking and enforcing a code style. For now, we'll add node_modules/ in it.
Now before we install prettier, let's add a couple of scripts in our package.json. The scripts are:
"lint": "eslint . --ext .js,.jsx,.ts,.tsx",
"lint:fix": "eslint . --ext .js,.jsx,.ts,.tsx --fix"
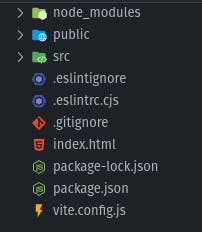
You should add these scripts in the "scripts" value below the "preview" option. You can use these scripts to check and fix all the errors shown by ESLint. Now after this, we're done installing ESLint and let's look at our file directory and package.json:

Installing and setting up Prettier
Installing Prettier
Now let's install Prettier and some other dependencies that are required to use Prettier along with ESLint. You can do that by typing the command in the terminal:
npm install prettier eslint-plugin-prettier eslint-config-prettier --save-dev
Setting up configuration files for Prettier
As we're done with installing all the dependencies, let's make some changes in the .eslintrc.cjs file. Add 'plugin:prettier/recommended' in the extends key. Also, add a new key called plugin and add ['prettier'] as its value and we need to tell ESLint that we'll be using prettier along with it. And now our .eslintrc.cjs looks like this:
Now that we have finished configuring ESLint to work with Prettier, let's proceed with setting up the required configuration files for Prettier.
First, let's create a new file named .prettierrc.cjs. In this file, we can define all the formatting styles that we prefer and love using in Prettier. Since you have specific rules that you prefer, you can add them manually. You can find a comprehensive list of rules on the Prettier website and customize the configuration file according to your preferences. Feel free to experiment and adjust the rules as you see fit.
module.exports = {
    trailingComma: 'es5',
    tabWidth: 4,
    semi: true,
    singleQuote: true,
    useTabs: true,
};
Now that we're done with this, let's create a new file and name it .prettierignore and add node_modules/ in its first line. This will stop Prettier from formatting the files in the node_modules folder.
The last step in installing Prettier will be adding one more script in package.json:
"format": "prettier --write ."
Installing and setting up Husky
Now that we have finished installing and setting up ESLint and Prettier, you might consider stopping at this point, which is perfectly fine if you won't be using Git and GitHub in your project. However, since I personally always use Git and GitHub for my projects, I would like to demonstrate how to set up Husky.
Before we proceed with installing Husky, let's first understand what Husky is and why we need it. Husky is a tool that enables us to run scripts and commands on specific Git hooks. But what exactly are Git hooks? Well, Git hooks are scripts that are executed at certain key points in the Git workflow. For instance, the pre-commit hook is a Git hook that is triggered just before making a commit.
By utilizing Husky to run scripts and commands on Git hooks (such as the pre-commit hook), we can automate various tasks. In our case, we can use Husky to execute specific scripts that format our code and check if the code adheres to the style specified by ESLint. It can even prevent the commit from being made if any errors are detected, such as code portions not following the specified style guidelines.
This will help us in making sure that the entire project follows a specific style guide even if someone else is contributing to the project.
You can start by typing the command in your terminal. Make sure you have initialized a git repository (you can do that by running git init)
npx husky-init && npm install
After running this command, you'll see some more files appear in your main directory and just to keep this tutorial easy and beginner friendly, we'll skip looking over most of those files. Other than that, you'll also see another script appear in your package.json which is of no use to us as of now, so we won't look at it and just leave it as it is.
In the .husky folder, you'll see a folder and a file named pre-commit. This file is what matters to us right now. Leaving the first 2 lines aside, you can then add as many commands or scripts as you want to run before making a commit. Then all those commands and scripts will be run before making any commit.
Now, we can add scripts such as npm run lint, npm run lint:fix, and npm run format in the pre-commit file. However, there is a problem with this approach. When you stage all the files before making a commit and the pre-commit script reformats all the files, those changes need to be staged again, otherwise, they won't be included in the commit. To address this issue, we can add the npm add . the command below all the scripts in the pre-commit file. This command will stage all the files again before the commit is made.
However, we still have another problem. As your ReactJS application grows larger with numerous components, pages, and utility functions, running all these scripts on all the files during each commit can become time-consuming. Even if you haven't made any changes to a particular file, these scripts will still run on it, which is unnecessary and a waste of time. To overcome this issue, we will utilize lint-staged.
Installing and setting up Lint Staged
Let's first understand what is Lint Staged and why are we going to use it. The official documentation states Lint-staged as "Run linters against staged git files and don't let slip into your code base!". So basically lint-staged is a tool that lets you run any script on the staged files. This sounds like the solution to the problem we talked about in the previous section. What lint-staged will do is whenever executed, it will run all the specified scripts over all the staged files and then stage them again but with the changes this time.
Installing lint-staged
You can install lint-staged using the following command:
npm install lint-staged --save-dev
Configuring lint-staged
Let's create a new file and name it .lintstagedrc.cjs and then we'll be adding all the scripts we need to run whenever lint-staged is called. You can do that by adding the following content to your newly created file:
module.exports = {
    '*.{js,jsx,ts,tsx}': ['prettier --write', 'eslint . --fix'],
    '*.{css,styl,html,md,json,yml,yaml}': ['prettier --write'],
}
The above file means that we'll be running the prettier as well as ESLint over all the files with js extensions and will be running all only the prettier over files such as CSS, HTML and MD. And again, don't forget, these scripts will run only on staged files which will save us a ton of time!
How do you make this file work? You can simply run npx lint-staged in your terminal and all your staged files will be formatted according to your configurations and will be staged again.
Configuring ESLint for Lint-Staged
We are almost done with this whole setup. Now the final step is for Husky to run lint-staged in the pre-commit. So basically, we'll tell Husky to run npx lint-staged command before every commit. How do we do this?
There should be a .husky/ directory in your root directory. In that folder, there should be a pre-commit file. Let's open the file and see what's in it. On the fourth line (I suppose), there should be a test script (npm run test). Let's delete that line and add npx lint-staged instead. This will tell Husky to run Lint Staged before every commit.
Now we're done with it. Let's make a commit and see if everything's working fine. If the code style doesn't follow your ESLint configuration and can't be fixed by ESLint automatically, your commit should automatically abort and the error message will be automatically displayed.
Conclusion
Oof... That was quite a lengthy tutorial, wasn't it? Don't worry, you don't have to remember every single step. Even I don't remember everything off the top of my head. The purpose of writing this blog/tutorial is to have a reference that you can revisit whenever you need it. Just like me, you can always come back to it whenever you want. The important thing is to understand what you're doing and customize it according to your preferences. So, feel free to refer back to this guide whenever you need a reminder or want to tweak the setup to suit your specific requirements.
I'm planning to make a short YouTube video on the very same topic, so stay tuned for that one. Let me know in the comment section if you want a video or if you need a blog on some other topic.
That'll be it from this blog, if you liked it then do give it the thumbs up and leave a comment to let me know what I can improve in this. You can connect with me on Twitter (@inclinedadarsh) and other social media handles: https://bento.me/adarsh. Thank you for reading this blog.
Happy Coding ;)